


")


 Calculator Template")


: What It Is and How to Calculate")


Managing large projects or services often means facing a challenge many businesses can’t avoid: delayed payments. In fact, 62% of small businesses struggle with late payments, significantly impacting their cash flow and overall financial health. Whether you’re working with high-value contracts or long-term services, waiting for the full amount can put a strain on your cash flow. But what if there was a way to ensure you’re compensated along the way, without waiting for the final payment to clear?
Partial payment invoices allow you to receive a portion of the payment upfront while your project or service is still in progress. It’s a win-win situation for both the business and the customer, ensuring consistent cash flow for your business while offering flexibility to your customers.
However, creating an invoice for partial payment isn’t as simple as it seems. Done right, it can boost your business’s financial health and client satisfaction; when done wrong, it can create confusion and delays.
In this guide, we’ll walk you through everything you need to know about creating effective partial payment invoices, from setup to best practices and how to avoid common pitfalls. Ready to learn how to organize your payment process and take control of your cash flow? Let’s get started!
What is a Partial Payment?
A partial payment is a payment made for only a portion of the total amount due on an invoice. This arrangement allows customers to pay part of the invoice upfront while the rest is paid later, typically once a product or service is completed. It’s an effective way for businesses to secure cash flow while providing customers with flexibility, especially for larger transactions.
Example: A vendor designs custom websites. The total cost of building a website for a client is $5,000. Instead of waiting until the website is fully completed, he decided to set up a partial payment invoice. The customer makes an initial payment of $2,500 to cover the first phase of the project, which includes the design mockups. The remaining $2,500 is due once the website is live. This way, the vendor can keep the cash flow steady while continuing to work on the project, and the customer doesn’t have to pay the full amount upfront.
With a partial payment invoice, both parties benefit: the business receives payment as the work progresses, and the customer enjoys the flexibility to pay in stages.
Why Create an Invoice for Partial Payment?

Creating an invoice for partial payment can be a good practice for your business, especially when managing larger projects or services. It allows you to get paid in stages, so you’re not left waiting for the full amount at the end.
1. Steady Cash Flow
By securing payments throughout the project, you ensure you have the funds to keep things running smoothly, whether it’s for materials, labor, or other expenses. This keeps your business financially stable, even during long-term projects.
2. Less Risk for Your Business
When you receive partial payments, you’re not left vulnerable if a customer decides to withhold payment at the end. With a portion of the total amount already paid, you minimize the financial impact of unpaid invoices.
3. Flexibility for Your Customers
Offering a partial payment invoice makes it easier for customers to commit to big projects. Instead of having to pay everything upfront, they can make smaller payments over time, making the process more manageable.
Example: A photographer working on a large wedding shoot. The total cost for the shoot and editing is $6,000. Instead of waiting until after the event to get paid, he sent a partial payment invoice for $3,000 before the wedding. This covers the upfront costs and ensures he is compensated for the work already done. After the wedding, the remaining balance of $3,000 is due upon delivery of the final edited photos. This way, he stays financially secure throughout the entire project.
Now that you understand the benefits of a partial payment invoice, let’s take a look at the key components you need to include when setting one up.
Key Components of an Invoice for Partial Payments
When creating a partial payment invoice, the goal is to ensure everything is transparent and straightforward. This helps both you and your customer stay on the same page throughout the payment process. Here’s a breakdown of the key components you should include:
1. Invoice Number
Each invoice should have a unique number for easy reference. This helps you and your customer keep track of payments and organize records efficiently.
Numbering invoices sequentially or with a clear system ensures there’s no confusion when managing your accounting.
2. Customer Details
Include your customer’s full name, address, and contact information. Accurate details ensure the invoice reaches the right person and can be tracked down if there’s a need for follow-up.
Including this information also helps keep accurate records for future reference and audits.
Pro-Tip: Send out invoices through emails; it helps keep track of all the payment-related details and ensures that the invoice is reaching your customers on time.
3. Description of Services/Products
Clearly outline the work done or products provided so far. This gives your customers an understanding of what they’re paying for.
For example, if you’re a contractor, you could specify that the foundation work has been completed, or if you’re a photographer, mention that the initial shoot has been finished. Providing this detail helps your customers understand exactly what they are paying for at this stage.
4. Total Amount
List the total amount due for the project or service. This is the full cost, including all fees, taxes, and additional charges.
While this number reflects the complete cost, the partial payment invoice breaks down the portions, making it clear how much is due at each stage.
5. Amount Paid
Highlight the partial payment received so far. This amount is typically displayed prominently so there’s no confusion about what has already been paid. If you have multiple installments, it’s helpful to show the total amount paid to date.
6. Remaining Balance
This section shows the remaining amount due. Make sure it’s clearly labeled so your customer knows exactly how much is left to pay. It’s important to be transparent here so there are no surprises later on. This will help prevent disputes and make the final payment process smoother.
7. Due Date for Remaining Balance
Specify when the remaining balance is due. Setting clear deadlines helps both you and your customer stay on track, ensuring timely payments and keeping your cash flow steady.
Example: A freelance graphic designer working on a custom logo design. The total price for the project is $3,000. He can create a partial payment invoice that looks like this:
- Invoice Number: 12345
- Customer: John Smith, 456 Oak St, Email: john@example.com
- Description of Service: Custom logo design (Phase 1 completed: Concept design and initial draft delivered)
- Total Amount: $3,000
- Amount Paid: $1,500 (Paid upon receiving the concept design)
- Remaining Balance: $1,500
- Due Date for Remaining Balance: 30 days from invoice date (Before final logo delivery)
This invoice clearly shows what has been done, how much has been paid, what is still owed, and when the balance is due, making it easy for both the freelancer and the customer to understand the payment progress.
How to Set Up Your Partial Payment Invoice

Setting up a partial payment invoice is straightforward, but it’s important to follow a clear process to ensure accuracy and avoid confusion. Here’s a simple guide to help you get started:
1. Choose Your Invoicing Tool
First, decide how you want to create and manage your invoices. Many businesses use online invoicing software like Peakflo, which allows you to easily create and track partial payment invoices.
If you prefer, you can also use a template in Word or Excel, but online tools often provide more automation and organization.
2. Set Clear Payment Terms
Before creating the invoice, establish the payment terms with your customer. Will the payment be split into two installments or more? Specify the amount due at each stage, and make sure both parties agree to the terms. This helps prevent misunderstandings later.
For instance, you might agree on 50% upfront and the remaining 50% upon project completion.
3. Include the Key Components
As we discussed earlier, be sure to include the essential components in your invoice:
- Invoice number: Unique for each invoice.
- Customer details: Name, contact, and address.
- Description of services/products: Clear breakdown of work completed so far.
- Amount paid: A portion of the total already received.
- Remaining balance: What’s still due.
- Due date: When the remaining payment is due.
4. Create Multiple Payment Milestones (if applicable)
For larger projects or long-term services, break the payment into multiple stages. For example, if you’re a web designer, you might have the following:
- First payment: 30% upfront when the project begins.
- Second payment: 40% when the design mockups are approved.
- Final payment: 30% upon project completion.
This ensures that you’re paid for each phase of work and helps keep your cash flow steady.
5. Send the Invoice on Time
Once your partial payment invoice is complete, send it promptly. Make sure the customer has all the information they need, including payment methods, bank details, or online payment options.
Timeliness ensures that payments are made when due and sets a professional tone for future transactions.
6. Track Payments and Follow Up
After sending the invoice, keep track of the payments you receive. If any balance remains unpaid after the agreed-upon due date, send a polite reminder to your customer. The key is to stay organized so that no payment falls through the cracks.
Now that we’ve covered how to set up a partial payment invoice, it’s important to be aware of some common mistakes that can arise in the process. Let’s see what to avoid to ensure everything runs smoothly.
Common Mistakes to Avoid
When dealing with partial payment invoices, several pitfalls can disrupt the payment process. Avoiding these common mistakes will help you maintain smooth cash flow and strong customer relationships.
1. Unclear Payment Terms
Not specifying clear payment terms upfront can lead to misunderstandings down the line. Always be clear about the amount due at each stage and when the remaining balance should be paid. If there are any late fees, include them as well. Setting clear expectations from the start ensures everyone is on the same page.
2. Failing to Track Payments
If you don’t keep track of what’s been paid and what’s still owed, you could end up with confusion or even missed payments. Make sure to regularly update your records and use invoicing software to stay on top of payments. This way, you’ll always know where things stand.
3. Not Sending Payment Reminders
A lot of businesses forget to send timely reminders, and that can lead to overdue payments. Don’t wait until the last minute to follow up. Automated reminders through invoicing tools can save you time and help keep things on track so payments come in on time.
4. Making the Payment Schedule Too Complex
A complicated payment plan can confuse customers and slow things down. Keep it simple by breaking the payment into a few clear stages. The more straightforward the schedule, the less likely it is that there will be confusion or delays.
5. Not Communicating Changes in Terms
Sometimes, things change, and payment terms might need adjusting. If that happens, communicate those changes as soon as possible. Always make sure your customer understands and agrees to any adjustments to the original partial payment invoice.
6. Letting Deadlines Slide
If you’re too lenient with payment deadlines, you risk setting a bad precedent. It’s important to stick to the agreed-upon terms. If payments are overdue, follow up promptly. Being firm but polite about deadlines ensures timely payments and keeps your cash flow steady.
7. Using Complicated Payment Methods
Make it easy for your customers to pay by offering simple and reliable payment methods. Whether it’s bank transfers, credit cards, or online payment systems, choose what works best for both you and the customer. Complicated payment methods can create unnecessary delays.
8. Neglecting Taxes and Legal Requirements
Ignoring taxes or legal requirements when creating your partial payment invoice can lead to complications later on. Make sure to include the right taxes and be aware of any legal requirements that apply to your industry. This ensures everything is compliant and avoids surprises down the line.
Now that you know how to avoid common mistakes with your partial payment invoice, let’s explore how Peakflo can help simplify the process and make invoicing easier.
How Peakflo Can Help in Creating an Invoice for Partial Payments
Managing partial payment invoices doesn’t have to be complicated. Peakflo makes the entire process simple and efficient, helping you create invoices, track payments, and communicate with customers without stress. Here’s how Peakflo can make invoicing easier:
1. Create and Send Digital Invoices

With Peakflo, creating and sending digital invoices is fast and easy. Whether it’s a full payment or a partial payment invoice, you can customize the digital invoice and send it in minutes. No more manual invoicing or paper trails. Digital invoices help speed up the payment process and make it easy for your customers to pay on time.
2. Track Payments and Customer Interactions
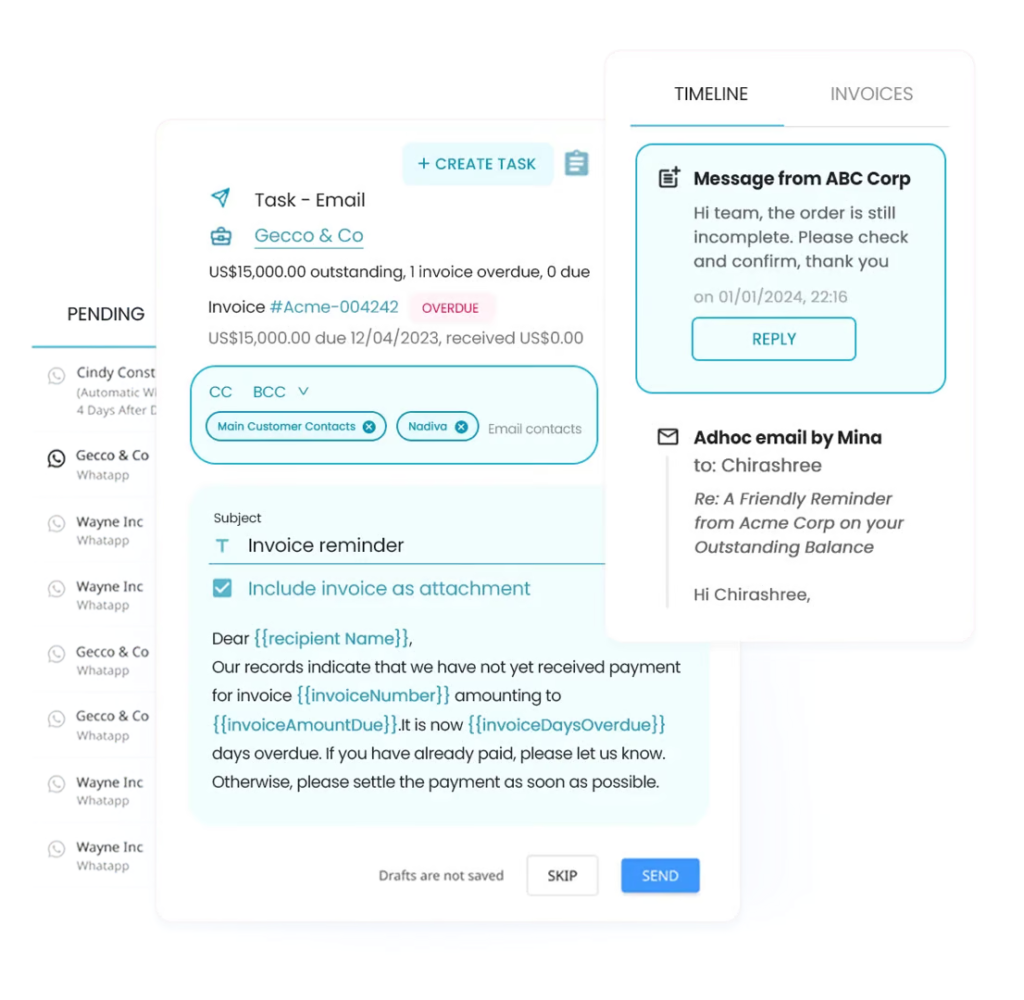
With Peakflo, you can easily track the status of partial payments in real-time. This means you’ll always know when a payment is made and when the next installment is due. Plus, with the Customer Portal, your clients can also check their payment status, reducing confusion and making everything transparent.
3. Send Custom Payment Reminders

You don’t have to manually remind your customers about upcoming payments. Peakflo allows you to set up automated reminders and customize messages to fit your brand’s tone. This ensures your customers are always informed about their payment deadlines, making it easier to stay on top of collections without extra effort on your part.
4. Monitor Cash Flow and Revenue
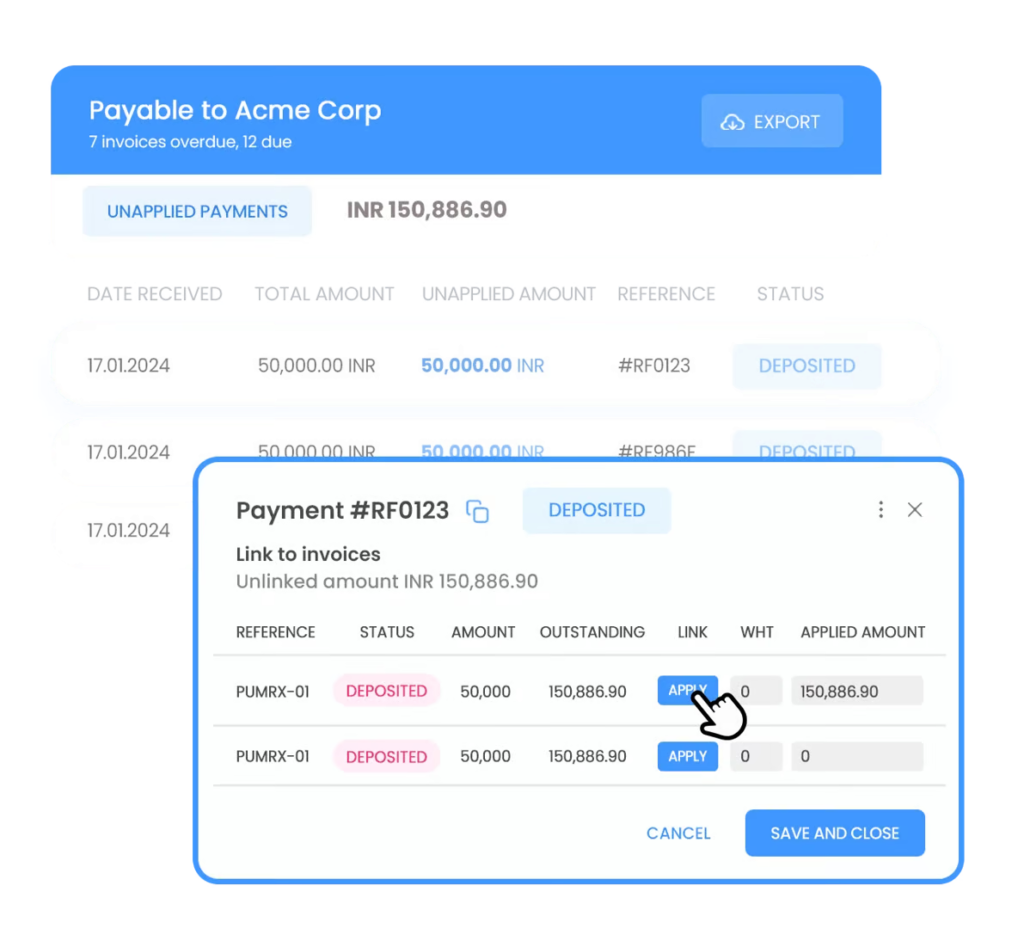
Keeping track of your revenue is important, especially when managing partial payments. Peakflo provides real-time updates on the status of your invoices, giving you a clear picture of your cash flow. You can easily see which invoices are overdue and which are on track, helping you stay organized and in control of your finances.
Managing partial payment invoices is simpler than you think with Peakflo. From creating professional invoices to tracking payments and sending reminders, Peakflo streamlines the entire process.
Conclusion
Handling partial payment invoices doesn’t have to be stressful. If you’ve been struggling with tracking payments, chasing overdue invoices, or keeping everything organized, you know how quickly things can spiral out of control. Manual invoicing, mixed-up payment schedules, and missed reminders only add to the chaos.
With Peakflo, you’ll save time, reduce mistakes, and keep your cash flow steady without the headache. You’ll never have to worry about missed payments or customer confusion again.
If you’re ready to take control of your partial payment invoices, improve your collections, and get your finances organized, book a demo with Peakflo and see how much easier managing your payments can be.

