Running a business comes with its share of surprises. From unexpected customer lunches to last-minute travel, these expenses can pile up quickly. In fact, according to the Association of Certified Fraud Examiners, expense reimbursement fraud accounts for 14% of all occupational fraud schemes, costing businesses thousands of dollars annually. Without a clear system to track and manage them, you might find yourself buried in a sea of receipts. That is where an expense report saves the day.
If you lead a team, you know your employees are often out in the field, buying supplies or covering travel costs for meetings. They count on getting reimbursed quickly. But how do you make sure every expense is tracked and accounted for?
This is where the expense report becomes essential. It helps you keep track of all expenses. It ensures your team gets reimbursed on time and helps you stay organized when tax season comes around.
Let us understand how to create and use an expense report, whether you are using a manual template or an automated tool.
Expense Report Overview
An expense report is a document that tracks business-related expenses made by employees or team members. It helps you stay on top of spending, reimburse your team, and organize everything for tax season. Whether you are a business owner or handling the finances, this is a tool you will come to rely on.
Here is what a typical expense report includes:
- Date of the expense
- Vendor/Merchant where the purchase was made
- Type of expense: travel, meals, office supplies, etc.
- Amount spent: total cost, including taxes
- Receipts: proof of purchase attached to each expense
You may also want to track the customer or project for which the expense was made. This will help you understand how each expense relates to your business goals and will help you during audits or tax deductions.
Now that you know what an expense report looks like, let us move on to choosing between manual templates and automated software solutions.
Choosing Between Templates and Software
When it comes to creating an expense report, you have two main options: using a manual template or opting for expense-tracking software. Both have their pros and cons, and the choice often depends on the size of your business and the number of expenses you need to manage.
1. Manual Templates – A manual template is often the first choice for small businesses or teams with fewer expenses. It is straightforward and gives you full control over how your report looks. You can find free templates online or create your own using software such as Excel or Google Sheets.
Here is why a template might work for you:
- Customization: You can design it to fit your specific needs, adding or removing categories as required.
- No cost involved: Templates are free to download or easy to create from scratch.
- Complete control: You decide how detailed the report gets.
However, using a manual template can be time-consuming. If your business grows, or if you are handling multiple reports a month, tracking everything manually might lead to errors or missed details. That is where software can make a difference.
2. Expense Reimbursement Software – Expense reimbursement software automates the process, making it faster and more accurate. If you find yourself spending too much time chasing receipts or adding up numbers, software can help you avoid these common issues. It also integrates with other tools such as your accounting software, making the entire process more seamless.
Key benefits of using the software include:
- Automation: It captures expenses automatically, reducing the need for manual data entry.
- Fewer errors: With built-in checks and balances, the chances of mistakes are lower.
- Real-time tracking: You can get a clear picture of your spending at any moment, without waiting for reports.
The software also lets you generate reports quickly, categorize expenses in seconds, and even submit them for approval with a click. For mid-sized to large enterprises, expense report automation saves valuable time and boosts accuracy, making it a worthwhile investment.
Choosing between templates and software depends on how many expenses you are managing and how much time you want to invest in tracking them manually. If your team handles a lot of expenses each month, switching to software will be the smarter option.
Now that you’re familiar with the available options, let’s walk through how to create expense reports both manually and automatically.
Manual Preparation Using Templates
Manual templates are simple and effective for smaller businesses or teams handling fewer expenses. If you are going the manual route, follow these steps:
- Start with a Template: Use a pre-designed template, or create one in Excel or Google Sheets. Make sure it includes fields for essential details such as date, vendor, expense type, and amount.
- Enter Personal Information: Include the employee’s name, department, and the reporting period for the expenses.
- List Each Expense: Record every expense under specific categories such as office supplies, meals, or travel. Be sure to include the date, vendor name, and purpose of the expense.
- Attach Receipts: Receipts are crucial for approval. Attach them to your report—either as physical copies or scanned images—so each expense is backed by proof.
- Calculate Subtotals and Totals: Add up the expenses by category (e.g., all travel costs) and calculate a total for the report. This makes it easier to review and verify.
By following these steps, you create a clear, detailed record of each expense. But if you are handling multiple reports or team members, automation might be the better path.
Automated Preparation Using Expense Software
If you want to save time and avoid manual errors, expense-tracking software is your friend. Here is how you can automate the process:
- Capture Receipt Images: Most software solutions allow you to upload receipts on the go, which are automatically stored and linked to the relevant expense.
- Download Transactions: Many tools can connect directly with bank accounts or company cards to pull in transactions. This eliminates manual entry.
- Categorize Expenses: The software can sort expenses into categories automatically, based on vendor details or previous entries. This saves you the hassle of organizing everything yourself.
- Submit for Approval: Once you have everything in place, you can submit the report for manager approval directly through the software. No need for paper trails, endless email chains, or lost receipts.
Automated systems simplify every step of the process, giving you more time to focus on what matters. Whether you are a small team or managing a growing business, expense tracking software can take the stress out of managing expenses.
Step-by-Step Guide to Creating Expense Reports
Creating an expense report might seem such a straightforward task, but getting it right ensures you stay organized and avoid confusion when reimbursements or tax filings roll around. Let us break this process down into two paths—manual preparation and automated preparation—so you can choose what works best for your business.
1. Adding, Editing, and Reporting Line Items
Once you have your template or software in place, the next step is to make sure every expense is correctly itemized. This is important for tracking, tax deductions, and ensuring nothing gets overlooked. Here is how to fine-tune your expense reports.
Editing Standard Expense Categories
Some businesses may have high travel costs, while others may spend more on office supplies. You will want to edit the standard categories to suit your specific needs.
- Adjust based on your business: If your team frequently travels, you might want to add specific categories such as airfare, lodging, or meals. If you are in an industry where entertainment is key, make sure you have a clear section for it.
- Make it detailed: Breaking down categories such as “office supplies” into subcategories (e.g., printing, stationery) can make it easier to see where the money is going.
Editing categories ensures that your expense report reflects the true nature of your business spending.
Itemizing Expenses for Detailed Tracking
Each expense should be listed separately, even if it feels repetitive. This creates a clearer record for auditing, tax deductions, or simply tracking your spending patterns.
For each expense, make sure to include:
- Date of purchase
- Vendor/Merchant name
- Reason for the expense
- Amount spent (including tax)
This level of detail can save you headaches down the road. Itemized reports make it easier to review spending, spot errors, and fast-track tax deductions when the time comes.
2. Calculating and Verifying Expenses
Once you have added and itemized all your expenses, the next step is to calculate and verify everything. This is where accuracy matters most. Getting the totals right ensures that your team gets reimbursed correctly, and you avoid any surprises during tax time.
Including Subtotals and Grand Totals
To make reviewing easier, group your expenses into categories (such as travel, office supplies, or meals) and calculate subtotals for each. This gives you a clear breakdown of how much was spent in each area before moving on to the total.
Here is how to go about it:
- Subtotals: Add up expenses by category (e.g., total travel costs).
- Total: Sum all the subtotals to get the total amount spent.
This breakdown helps in organizing and allows you to spot any anomalies in your spending, such as an unexpected spike in a specific category.
Techniques for Visualizing Total Expenditures
It is one thing to see the total number at the bottom of the report. But truly understanding your spending helps you visualize it. A software offers enhanced visibility with intuitive reports featuring drill-down capabilities, allowing you to get a better picture of where your money is going.
Some tools offer:
- Expense summaries: Automatically generated charts that categorize spending.
- Real-time tracking: Software that shows live updates on spending throughout the month.
Visual aids such as these help you catch trends early, making it easier to budget and adjust as needed.
Verifying Amounts Before Sending the Report
Before submitting the expense report, take a moment to verify the amounts. Mistakes can happen, whether it is a missing decimal or a misplaced receipt. Reviewing ensures that every expense is accounted for and nothing is missed.
Here is what to check:
- Receipts match: Ensure that every expense listed has a matching receipt attached.
- Categories are correct: Double-check that each expense is categorized properly (e.g., travel versus meals).
- No errors in totals: Confirm that subtotals and grand totals add up correctly.
This step might feel tedious, but it saves you time in the long run by avoiding the back-and-forth that comes with corrections.
Once your expenses are verified, it is time to organize your receipts and prepare for submission.
3. Attaching and Organizing Receipts
Attaching receipts to your expense report is crucial. These receipts act as proof of each expense and ensure that everything aligns when your finance team reviews the report. Whether you are submitting the report manually or through software, getting this step right avoids any delays in reimbursement.
Importance of Attaching Proof of Expenses
Receipts are very essential in your expense report. Without them, your report could get flagged, questioned, or rejected altogether. Attaching receipts for each expense validates your report and ensures smooth approval.
Here is why attaching receipts matters:
- Proof of purchase: Every receipt serves as verification of the amount spent.
- Tax purposes: Proper documentation helps businesses during tax season when proving deductions.
- Transparency: Having clear documentation builds trust with your finance team.
Submission of Receipts in Electronic or Printed Formats
In the past, submitting physical copies of receipts was the norm. Now, with digital tools available, it is far more efficient to scan and submit receipts electronically. Most software allows you to upload images of receipts directly, speeding up the process and reducing the risk of losing paperwork.
Your options for submitting receipts include:
- Physical copies: Useful if you are using a manual system. Just make sure they are attached to the report.
- Scanned images: Upload high-quality scans or photos of each receipt for easy tracking.
- Receipt capture via apps: Many tools offer a “receipt capture” feature where you take a photo, and the software automatically logs the expense.
Regardless of which method you use, make sure every receipt is organized and matches the corresponding expense in your report.
Integration with Third-Party Apps for Seamless Attachment
If you are using expense tracking software, there is often the option to integrate with third-party apps that make receipt submission even easier. Apps such as Peakflo allow you to capture receipts on the go and attach them to the report in real-time.
Benefits of using third-party apps:
- Real-time updates: Snap a receipt, and it is immediately added to your expense report.
- Cloud storage: Receipts are stored securely, reducing the chance of losing them.
- Automatic categorization: Some apps can automatically categorize expenses based on vendor details, saving you time.
Software and apps can streamline the process of attaching and organizing receipts, making it less of a hassle.
Your report is nearly ready, with receipts securely attached. Next, we will examine how to submit the expense report for approval.
4. Submitting the Expense Report
After you have compiled all the details, itemized the expenses, and attached the receipts, the final step is to submit the expense report for approval. This step may seem straightforward, but it is essential to get it right to avoid any delays in reimbursement or issues with tracking business spending.
Steps to Print or Send the Report
How you submit your report depends on whether you are working with a manual template or an automated tool. Regardless of the method, the goal is the same: to ensure that your report reaches the right person and gets processed quickly.
- Manual submission: If you are using a manual template, print the report, attach the receipts, and hand it to the appropriate manager or accounts payable department. Make sure everything is in order before submitting it.
- Digital submission: With expense tracking software, the process is even simpler. Most tools allow you to submit your report with a single click, directly sending it to your manager or finance team for approval. No need to chase down paperwork.
Before submitting, double-check the report to ensure that all details are correct and receipts are attached.
Obtaining the Manager’s Approval
Once the report is submitted, it goes through an approval process. For smaller teams, this might be a quick review by your direct manager. For large enterprises, it might go through a more formal approval chain, including finance teams and higher management.
Here is how the approval process typically works:
- Manager review: Your manager or department head reviews the report for accuracy. They check that the expenses align with company policies and are within budget.
- Finance team verification: If approved by your manager, the report is passed on to the finance team, who verifies the amounts and receipts before initiating reimbursement.
If something is off, such as a missing receipt or an expense that does not align with policy, your report could be sent back for revisions. To avoid this, be thorough before submitting.
Exporting Reports to Excel or PDF Formats for Distribution
If you need to share the report with others in the company, or if your manager prefers a different format, you can export it. Whether using software or a manual system, most tools allow you to export the expense report to Excel or PDF formats.
- Excel: Ideal for teams that need to analyze the data or track expenses over time.
- PDF: A locked format, perfect for sending final versions that do not need editing.
Sending the report in the preferred format keeps the process smooth and ensures that everyone has access to the same information.
With the report submitted and approved, you are now ready to get reimbursed or log the expenses for tax purposes.
Next, let us understand how Peakflo can streamline your expense management process.
How Peakflo Can Help with Expense Reports
Managing expense reports can be time-consuming, especially with steps such as data entry, approvals, and policy checks. Peakflo makes this process faster and more accurate.
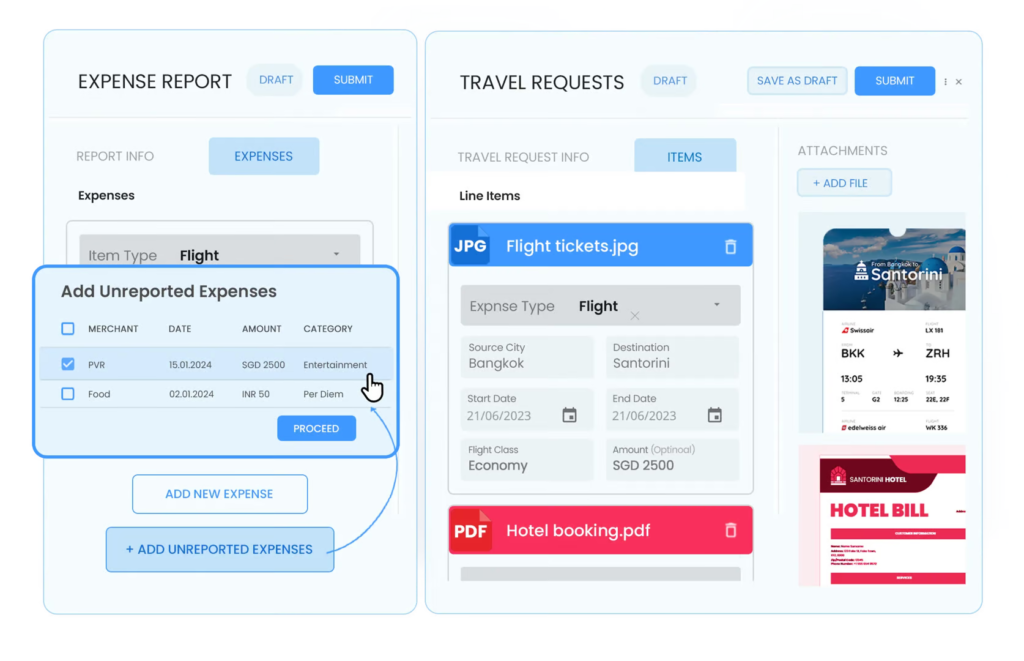
Here is how Peakflo streamlines expense report management:
- Automatic Data Capture
Peakflo captures data automatically from invoices and documents via email, WhatsApp, or SFTP. This cuts down the need for manual data entry and saves you time. No more sorting through receipts or entering each expense manually—Peakflo handles it all.
- Streamlined Approval Process
Peakflo automates approvals. You can set up rules, and reports are sent to the right person automatically. This reduces delays and back-and-forth emails. Approvers can review and approve reports in real-time, speeding up the process.
- Real-Time Budget Tracking
With Peakflo, you can create budgets and track expenses in real-time. This keeps spending in line with your budget, so there are no surprises at the end of the month. Everything is tracked as it happens.
- Comprehensive Expense Management
From travel requests to reimbursements, Peakflo manages it all. Employees can submit travel requests, and once approved, expenses are tracked on the same platform. Reimbursements are also seamless once reports are approved.
- Expense Policy Configuration
Peakflo lets you configure your company’s expense policies on the platform. You can define reimbursable expenses and set travel policies. This ensures employees follow company policies, making the process efficient and transparent.
- Mileage and Fuel Reimbursement
Peakflo simplifies the process for businesses that reimburse mileage and fuel. You can set fuel rates by date and category, making reimbursements easy and accurate.
- AI-Powered Automation
Peakflo uses AI to match expense reports with receipts automatically. Its OCR technology detects discrepancies, ensuring accuracy before approval. This reduces errors and flags possible policy violations.
- Anomaly Detection
Peakflo’s AI helps spot unusual spending or policy violations in real-time. It sends alerts to stakeholders so they can take quick action, which is great for spotting fraud or misuse of company funds.
- Centralized Communication and Audit Trail
Peakflo provides a single platform for all expense-related communications and approvals. This creates a clear audit trail, so it is easy to track report status. Everyone stays on the same page without multiple apps or email chains.
- Seamless Integration with Accounting Systems
Peakflo integrates with your accounting software, such as QuickBooks or Xero. It syncs your expense data directly into your financial system, saving time and reducing errors. Everything works together smoothly.
By automating key aspects of expense report management and providing real-time insights, Peakflo takes the complexity out of managing expenses, helping your team focus on more critical tasks.
Conclusion
Creating and managing expense reports does not have to be a tedious task. Whether you are manually entering expenses into a template or using software to automate the process, the key is having a system that works for your business. By itemizing expenses, attaching receipts, and ensuring everything is submitted correctly, you make life easier for both yourself and your finance team.
However, if you are looking for a way to save time and reduce manual effort, Peakflo offers a solution that streamlines the entire process. From automatic data capture to real-time budget tracking and approval automation, Peakflo transforms the way you handle expense reports. It keeps everything organized, ensures compliance with your company’s policies, and integrates seamlessly with your accounting system.Incorporating a tool such as Peakflo into your expense management process can take the headache out of manual reporting, leaving you more time to focus on growing your business. Ready to simplify your expense reports? Book a demo with Peakflo





![Why AI Sales Calls Are Making Good Sales Reps Even Better [2025 Guide] ai sales calls](https://blog.peakflo.co/wp-content/uploads/2025/09/65168cf6-3001-4733-8cbc-12d5684cf449-218x150.webp)


